Instapage is a popular landing page platform that provides businesses and marketers with tools to create high-converting landing pages quickly and easily. And most, if not all, of these landing pages are designed for specific marketing or advertising campaigns, with a primary focus on acquiring leads, collecting their email addresses, and driving them to take a particular action, such as signing up for a newsletter, downloading an eBook, or making a purchase.
To ensure your landing pages work as expected, it's essential to make sure the email addresses you gather are both accurate and capable of receiving emails: in this article, we'll show you how to avoid invalid email addresses and typos on your Instapage landing pages using the free Verifalia widget. This way, you'll only accept valid and deliverable emails on Instapage!
How to verify email addresses in Instapage
Instapage has a built-in feature that validates the format of email addresses, which you can activate by editing the specific field where email addresses will be entered: to enable it, you simply need to select "Email Validation" from the dropdown menu labeled "Input formatting requirement". However, it's important to note that this built-in validation, while helpful, is not flawless: it allows invalid email formats like “””@[999.999.999.999] to pass while blocking email addresses with perfect syntax, such as foo."bar"@example.com, even though they might be uncommon.
On top of that, Instapage doesn't verify whether the email addresses collected on its landing pages can actually receive emails: this can result in collecting typos, temporary or disposable email addresses, and email addresses that will bounce when you try to send a message to them!
Luckily, a solution exists: you can easily verify the validity and deliverability of the email addresses you collect on your Instapage landing pages using the Verifalia widget. This widget automatically checks email addresses with the Verifalia email checker, ensuring that they are real and able to receive emails, and effectively blocks invalid and undeliverable email addresses from entering your Instapage landing pages. Importantly, you don't need to be tech-savvy because it's a straightforward integration that doesn't require any coding.
How to add the Verifalia widget to an Instapage landing page
To add the Verifalia widget to an Instapage landing page, follow these steps:
- Edit your Instapage landing page in the Instapage user interface.

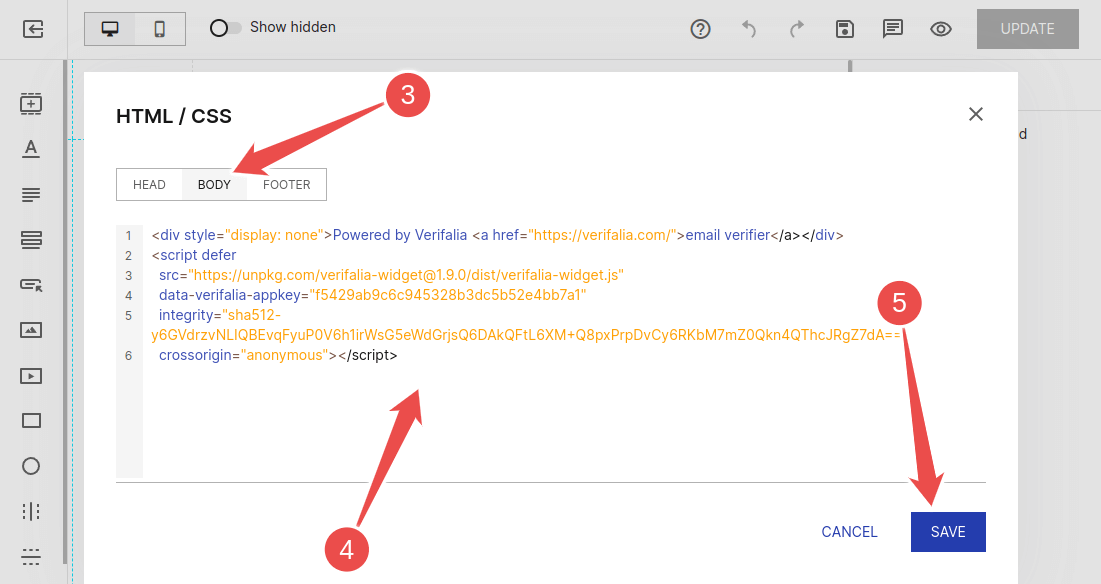
- In the sidebar, find and click on the "HTML/CSS" link.

- Within the "HTML/CSS" section, select the "BODY" link.
- Paste the code snippet that you can copy from the Verifalia dashboard into the HTML editor. If you don't have a Verifalia account, simply register for free. Using the widget requires a browser app key (a sequence of alphanumeric characters): create a browser app, if you don't have one already. Once you are on the Verifalia dashboard, you can easily generate the necessary embedding code from the Embeddable widget tab, which will include the aforementioned HTML code snippet.
- Click "Save" to save your changes.
- Finally, click the "UPDATE" button to publish the updated Instapage page.